Look it up!

Sunday, May 25, 2014

Ribbon flowers

http://ribbonflowers.blogspot.com/

Our third project were these adorable little flowers. We actually hardly followed about half of these instructions due to the fact we did not have the wood burning tool, and the washers we had were not large enough for our ribbon. Instead, we started by cutting five small pieces of ribbon that were all the same size. Then we rounded the ends of them. 
As you can see they all are basically the same size. Next we took some thread and a needle, then sewed through the bottoms of each, attaching them together so the same sides faced the same way. 
They should look like the above picture. If you would like a tighter flower, use a short amount of thread. Sabrina did this and her petals looked like this: 
When you have sewn through them all, tighten the bunch and tie the thread before the note and the thread near the needle together very tight. 
The top picture is mine, and the bottom is Sabrina's. When the thread is tied, just cut off the needle and any stray thread and you're done. If you want you could decorate with these, even make a hair clip out of one of these. They can come in all shapes and sizes just as long as you get thicker ribbon. Thanks for reading and have fun! ~Blondie~ 


A fluffier box cake and decorating it


This next recipe we found to make the cake fluffier, and after we made it fluffier we decorated it fabulously. We started with separating the egg yolks from the whites. Our two boxes of mix each called for 3 eggs, so we ended up separating six eggs. The whites we poured into a seperate bowl. 
It said to whip the egg whites until they were stiff, but Sabrina and I had an interesting time with that. We hand whipped them for about seven minutes until we gave up. They came out more like foam with whites. I would recommend using some sort of electric mixer if you're going to do this correctly, as we did not do it correctly, but we did it almost as accurately as it should have been. When you have the egg white done, set them to the side. 
  
  
So the next step is to sift all of the cake mix into your mixing bowl. Word of warning: be sure you have a working sifter before you attempt to do this. Above are the results of having to do two boxes of cake mix with a broken sifter. We sifted through about half a cup of it with the help of a spoon, and the bottom picture shows how light and fluffy the mix looks. The grisly bits left in the sifter when you have completed this task you throw away. 
  
Here you can see we tried to sift it with a tuna strainer, and you can also see the grisly bit left over in the strainer. The strainer worked a little better than the broken sifter, but I would recommend a real sifter. We finally just gave up and dumped the rest in, then gave it a good whisking with the electric mixer until it looked nearly as good as the sifted part had. 
Next we added in flour. For one box of cake mix it's 3 tablespoons, but we doubled it for our two boxes and had six. Then we added in all the rest that was called for on the boxes, but instead of the whole eggs you need to only add the leftover yolks. 
If you can't tell the yolks look really gross. 
We mixed everything together then, and the batter looks like basic, stereotypical cake batter. Nothing special. 
Then we carefully folded in the egg whites, making sure to fold it and not just hit it with the electric mixer, or else whipping the whites would be pointless. 
Next we seperated the batter little by little and dyed it different colors. For ours we did different colors of purple...
Then we left the leftover purple inside and made a grey color. When we had finished mixing the colors we layered them into the pans as follows: 
Be sure you butter the pans really well with butter spray, even on the edges. If you would like, use some  parchment paper and put a circle in the bottom of each pan. This works really well to help get the cake out of the pan later, but without it and with a ton of butter works just as well. On our cake we went without the parchment. Even though the grey looks really dark it actually baked into more of a purple grey than we thought it would be. 

After that we baked them. The two smaller pans took 27 minutes to bake, then the largest pan took 34 minutes. The minute they were done we pulled them out and put them in the freezer. They sat in the freezer for a little over an hour before they were cooled down and a little more firm to flip out of the pans. 

To flip them out of the pans I used a small metal spatula like the above one. I used this to cute along the edges, then we carefully pried under it to shake it loose before we flipped it onto the pan. 
The first tier was easy to flip because as long as it made it onto the spinning platter it didn't really matter where it was. We used a large spatula to cover it in our choice of colored frosting. When doing the edges, be sure your spatula is vertical and work with the cake or you will end up with extensive crumbs. 
 
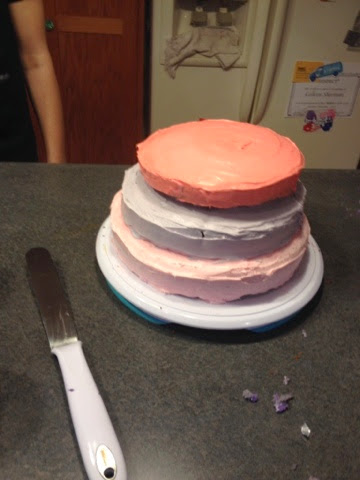
The second tier we placed on by flipping it onto the fingertips of our hands before carefully lowering it into the middle. I spotted and Sabrina placed it. As you can see in the above picture, the purple coloring in the frosting worked very well. 
The last tier went on very well too, although I would recommend leveling off the top of the cakes in order to prevent the cracking you can see in the middle tier in the above picture. When attaching the cakes together we put a blob of frosting to act as glue. This helped hold it together better. 
When we had completed the cake, we debated on design ideas. Sabrina had brought along hard pearl candies that looked like this: 
We finally agreed on placing these on the edges about an inch apart all around the cake. 
We contrasted our colors on the first two tiers, then on the top we switched between the colors. It ended up looking very professional. 
On the top we put an S for our names. Since Sabrina is an artist, the S turned out amazing. When we were done it was definitely worth it due to how amazing it looked and tasted. For how amazing it turned out it didn't truly take a lot of work. I hope you'll try it! Have a good weekend! ~Blondie~ 


Saturday, May 24, 2014

Jello shaved ice (simple and yummy)

http://www.tipsfromatypicalmomblog.com/2013/06/jello-homemade-shaved-ice.html 
       So this recipe is what we started with, and we absolutely, completely loved it. For ours, we started with watermelon Jello and 7up. I think diet soda would also work, but Sabrina said the flavor might change. You will need two cups soda, 1 cup water, and an average packet of any flavor of Jello.  Start out boiling a cup of water on your stove. For ours we didn't really give it a chance to get it to a rolling boil, we more let it boil with medium sized bubbles. Seeing as we're impatient teenage girls, I'm sure you could let it boil for a while as you perform other tasks, but we didn't.
After it was boiling, we poured it into a medium loaf pan and immediately poured in our pack of watermelon Jello. In the recipe it recommends a square pan, but a loaf pan works just as well. Then whisk it until the Jello has dissolved into the boiling water. 
 
When the Jello is dissolved, pour the soda in. It will look like the above picture, with foam on the top. Make sure you thoroughly combine the soda in, in ours we didn't do so and we ended up with some Jello parts in the ice parts. Whisk it in really well, then put it in your freezer. 
 
This needs to be frozen for four hours, or maybe an hour extra, but if you put it in overnight it's likely you'll want it to sit out for a little while before you are able to scoop into it. When it's in the freezer be careful not to bump it because Sabrina accidentally lightly bumped it and the liquid swayed nearly to the edge. 
When your four or more hours are up, it should come out looking like this. The ice inside shouldn't be jiggly at all. Use an ice cream scoop and scoop it into cups or bowls, as this could be a drink or a snack. 
We used cups, and everyone who was even a little hungry took two scoops. Everyone also used spoons, but if we didn't finish it immediately it became just as easy to drink. Sabrina thought that the Watermelon flavor was a bit extreme, but I liked it that way. I guess you'll just have to make your own analysis! Have fun! ~Blondie~ 


Introducing the start of a fantasmicalabulous day!

Good morning! Yesterday I spent the day working through a really great set of projects with this girl: 
 This is my friend Sabrina, as you should know from my extensive mentions of her. We like to call ourselves Team Fantasmicalabulous, a nickname we invented my junior year when we performed a speech duet together. 
          Anyway, we found a list of five different projects or recipes off of Pinterest we wanted to do, then we spent the afternoon until ten o'clock last night putting together each project. I've taken pictures and my next five blog posts will be about these projects: 
Jello shaved ice
A fluffier box cake and decorating it
Ribbon flowers
Sock bear
Sock gloves

I'll reference the certain pin, along with telling you what did and didn't work for me. So go ahead and look through them! I'll start posting each as soon as I can. Thanks! ~Blondie~ 

Thursday, May 22, 2014

Editing

Yesterday I started editing and revising my novel again. I suppose I should be overwhelmed, but it's the most calming thing I've done in a while. 88 pages of mess for me to clean, straighten, and perfect to a point that any editor would love it. This has long been a dream of mine, and I hope to achieve it by the end of this year (2014). If anyone would like to read it, even possibly revise it I would be extremely grateful. Well, I'm wiped, but tomorrow I shall share pictures from my Pinterest party! Bye! ~Blondie~ 

To be a grad... or to not be a grad... That's no longer the question.

          Hi Guys! Do you like my new platform? I'll admit I need to tweak some stuff, it definitely needs a smattering of color so I promise I'll work on it. For now, I'd like you to look at these beautiful pictures.
I have the best boyfriend in the world and he didn't even say anything when he realized I was taller than him in my heels. 
 My cousins, their kids, and my aunt all came to my graduation party. This is the best picture we got of us all.
 My cousins' son, Ezra, was born the day before my party and my cousins were crazy enough to come to the party with him. He's so cute!
 These are my girl cousins on my mom's side. I love them so much.
 Here's my whole family right after the ceremony. All the picture taking was crazy but this is a pretty good one.
 My sweet boyfriend got me flowers and I couldn't resist to take a goofy picture.
 I love my grandparents so much.
 My mom gave me my diploma.
 This was a good one with my parents.
I don't know what I'm going to do without my best friend Sabrina by my side next year.

         If you couldn't tell, my graduation went well. I was surrounded by family and friends who love me and I actually had a lot of fun. My next step is summer, then I move into college on August 22nd and boy am I nervous. For now though I plan on cherishing this summer. Stay tuned for an update, as that girl in the last picture (Sabrina) and I are planning on having a Pinterest party, complete with pictures of steps, what is should be, and how it turned out. You will be highly entertained, I promise. For now, I am going to nap before I go to work. TTFN! ~Blondie~

Wednesday, May 7, 2014

Saying Goodbye (because my posts aren't emotional enough)

Hey guys! So I only have six days of high school left, and everything’s starting to get a little… emotional. I’m gripping to each day, hoping to complete my homework and still be able to enjoy my lasts. Last concert, last day of walking to class with my best friend… some of these lasts are going to make me cry, guaranteed, and I used to be a person who didn’t cry very much.

Monday was senior skip day, and I had lunch out with my friend and mom, then we went to my house and watched a movie while we did homework. Honestly I’m just exhausted and fed up with the teachers and even some of my classmates who I can normally deal with. I’m counting down the days like it needs to speed up, but I just want each and every day to slow down.

A week and 5 hours from now I’ll be saying my final goodbyes. Goodbye to the hallways that my friends and I circle in the morning just to have something to do, goodbye to the different classrooms I’ve been taught in through the years, even goodbye to my silly little locker I don’t even use anymore. Look at that, I’m getting emotional. I knew I would. I can hardly stand to think about the end of the summer and all the goodbyes that will entail. Goodbye to seeing my friends face to face every day, goodbye to singing with my friend Sabrina just because we feel like it.

Oh my gosh the emotions… this isn’t okay. I should go before I continue and cry. But I just wanted to say that after I graduate my blog should still be accessible, just possibly on a different platform. I’ll make sure that you all know.

Bye!