This next recipe we found to make the cake fluffier, and after we made it fluffier we decorated it fabulously. We started with separating the egg yolks from the whites. Our two boxes of mix each called for 3 eggs, so we ended up separating six eggs. The whites we poured into a seperate bowl.

It said to whip the egg whites until they were stiff, but Sabrina and I had an interesting time with that. We hand whipped them for about seven minutes until we gave up. They came out more like foam with whites. I would recommend using some sort of electric mixer if you're going to do this correctly, as we did not do it correctly, but we did it almost as accurately as it should have been. When you have the egg white done, set them to the side.


So the next step is to sift all of the cake mix into your mixing bowl. Word of warning: be sure you have a working sifter before you attempt to do this. Above are the results of having to do two boxes of cake mix with a broken sifter. We sifted through about half a cup of it with the help of a spoon, and the bottom picture shows how light and fluffy the mix looks. The grisly bits left in the sifter when you have completed this task you throw away.

Here you can see we tried to sift it with a tuna strainer, and you can also see the grisly bit left over in the strainer. The strainer worked a little better than the broken sifter, but I would recommend a real sifter. We finally just gave up and dumped the rest in, then gave it a good whisking with the electric mixer until it looked nearly as good as the sifted part had.


If you can't tell the yolks look really gross.

We mixed everything together then, and the batter looks like basic, stereotypical cake batter. Nothing special.

Then we carefully folded in the egg whites, making sure to fold it and not just hit it with the electric mixer, or else whipping the whites would be pointless.

Next we seperated the batter little by little and dyed it different colors. For ours we did different colors of purple...

Then we left the leftover purple inside and made a grey color. When we had finished mixing the colors we layered them into the pans as follows:


After that we baked them. The two smaller pans took 27 minutes to bake, then the largest pan took 34 minutes. The minute they were done we pulled them out and put them in the freezer. They sat in the freezer for a little over an hour before they were cooled down and a little more firm to flip out of the pans.

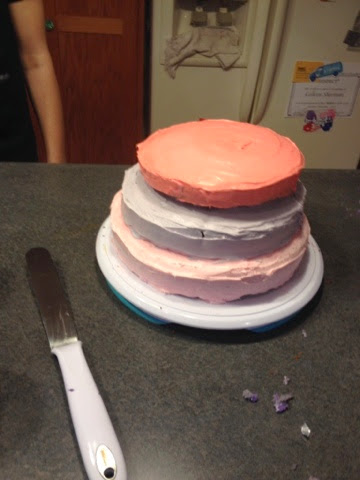
To flip them out of the pans I used a small metal spatula like the above one. I used this to cute along the edges, then we carefully pried under it to shake it loose before we flipped it onto the pan.

The first tier was easy to flip because as long as it made it onto the spinning platter it didn't really matter where it was. We used a large spatula to cover it in our choice of colored frosting. When doing the edges, be sure your spatula is vertical and work with the cake or you will end up with extensive crumbs.

The second tier we placed on by flipping it onto the fingertips of our hands before carefully lowering it into the middle. I spotted and Sabrina placed it. As you can see in the above picture, the purple coloring in the frosting worked very well.

The last tier went on very well too, although I would recommend leveling off the top of the cakes in order to prevent the cracking you can see in the middle tier in the above picture. When attaching the cakes together we put a blob of frosting to act as glue. This helped hold it together better.
When we had completed the cake, we debated on design ideas. Sabrina had brought along hard pearl candies that looked like this:

We finally agreed on placing these on the edges about an inch apart all around the cake.

We contrasted our colors on the first two tiers, then on the top we switched between the colors. It ended up looking very professional.

On the top we put an S for our names. Since Sabrina is an artist, the S turned out amazing. When we were done it was definitely worth it due to how amazing it looked and tasted. For how amazing it turned out it didn't truly take a lot of work. I hope you'll try it! Have a good weekend! ~Blondie~
No comments:
Post a Comment