Hi guys! How's life? I just spent the day doing nearly nothing. Okay fine, I woke up, ate toast for breakfast, watched my sisters' soccer game, came home, ate lunch, applied for a second job, ate dinner and... Oh! There is that one thing I did...
So when I first heard about the show Pretty Little Liars all I could think was 'This is ridiculous. Crazy, scary, nothing I would ever watch.' Then I watched a Halloween episode and I was hooked. Once I mentally got the four main characters straight (Hanna, Spencer, Aria, and Emily) I could follow along to the new episodes. Nowadays, though, there is only a day until the new episode and I desperately want to get through the previous seasons before the new episode comes out because sometimes I get a little...lost.
So, for those of you that don't know anything about the show, here's the gist: the main characters mentioned above were at a sleepover with their friend Alison on the night she went missing. Later she is found to be 'dead' but they get these texts from the mysterious A as weird and creepy, even life-threatening things keep happening. The thing is, this new episode supposedly tells us who A is (yeah so catch up before you watch brand-new or the series will be ruined for you. I hope.) and I'm watching through these 45 minute episodes trying to find my own clues as to who it could be. So yes, as the title says, I have a Pretty Little obsession.
Whelp, now that you've heard me obsess over MY favorite show, tell me what yours is! Just comment your favorite show and I will pick one or two to right about in my next blog post!
Good night! ~Blondie~
Sunday, June 8, 2014

Friday, June 6, 2014
Sock bears
And now for our last project. We used the last socks from the four pack we bought to make little teddy bears. It seems silly, I know, and our bears would tend to agree, but they actually turned out adorably.


You need 3+ buttons and 1 sock. Your supplies should include some thread, a needle, and a permanent marker.
Above, you can see a rough sketch for the sock pattern. The toe part should look like the outline of ears. The butt should be the heel of the sock. Cut out the lines in the rough sketch, but add your own flair in any way you want.
Make sure that the pieces have the wrong sides out then stitch along all sides except half of one side on every piece. Once you have that done, inside it out without tying off the thread. Then stuff the piece, fold in the fabric then press them together with your fingers as you stitch up the side. Then tie it and cut it off.
The one piece that is odd is the body. Stitch the legs inside out the whole time, then cut the thread off, right side it out and stuff it.
At the top of the body put stitches in it that makes a circle, then tighten it up to close the hole. The tail of the thread can then be tied to the end of the thread, then cut it off. This will create the body and when you have the head and arms stuffed you can move into putting it all together.
The arms should be simple to sew on in the area that arms go, as is above. For the head, take the stub at the top of the body and stitch the back of the head to the stub. The ending look should be something like above.
Next pick out your buttons and sew on a nose and eyes. If you want, accessorize you bear in any other way you like.
These are our bears:
So we didn't go precisely by the instructions but they turned out adorably! Enjoy!
~Blondie~
Monday, June 2, 2014
It's raining, I'm not snoring...
Last night this very interesting storm came through my little town. I dislike storms more than you could believe, and as the wind whipped the chairs on our deck, and the lightening was echoed with thunder, my imagination started to go crazy with ideas of what could happen. Broken windows, fallen trees... Sure it wasn't even a storm worth caring about, but my imagination is powerful. Do any of you ever do this? Next time it rains, snows, or there is any inclement weather let your imagination run free. Though it's scary, it also brings a little bit of fun to the storm.
I'll finish my last craft post soon!
~Blondie~
I'll finish my last craft post soon!
~Blondie~
Wednesday, May 28, 2014
Sock gloves
http://interestings.org/diy-mittens-gloves/

First, start out with a pair of long socks. Short socks would probably work but you'd want the part without the feet to be at least half as long as these.

Cut off the feet of the socks. Most people would just throw away the feet, but my sisters took the feet from ours and found they were comfy as around-the-house socks.
Next you want to put the socks on your arms. The top of the sock should be by your elbow. Adjust the sock until you know where you want your thumb to bed, then mark it out with a small line half the size of you thumb at the base. Then take each off and cut where you marked it out.

You should have something that looks relatively like this. From there you can decorate it and make it yours.

Sabrina's looked like this. She plans on drawing on them to make them her own.
So that's the gloves we made! Pretty simple, right? The fun part about this is how you can make it anyway you like. I hope you have fun making it your own! ~Blondie~
Monday, May 26, 2014
The end of the thing we've been working for for 15 years
The last two weeks have been constant thoughts about graduating, school ending, keeping the memories, and so many emotions that go swirling through everything it's so hard to believe that this is it. This is the end. 
I remember preschool. I mean, not well, but I spent two years in the same classroom playing house, coloring, thinking that that was how school was for everyone in every grade. I remember using sugar cubes to make tea for my teachers, and I remember loving the markers that were stuck in a block of work so we wouldn't lose the marker tops. Then those two years ended and I no longer had my little orange flower symbol by my name so I knew it was my name.
Kindergarden I remember writing things by copying from a projector, and I remember writing my name for the first time. Nap time was mandatory for us, and I couldn't stand it. Nowadays that's all I hope for. In first grade I remember sitting at tables in a little classroom, and I felt so grown up. I learned to read in second or third grade, and it took me a little longer to learn to read, if I remember correctly, than other kids in my class. After I learned to read, though, I couldn't stop.
Fourth grade we were on a different floor of the school, and in the fall of that year we changed to a new house. My mom would drive my sisters, brother, and I to school every school day that whole year, and I remember bouncing over the gravel road as we went back and forth. When that year ended, though, we changed to a new school, and I said goodbye to my best friend.
Fifth grade I got braces along with a new friend. Our moms became friends, and we would spend time through sixth grade just having fun together. Sixth grade I became the crazy gerbil girl, and I loved my little pets so much.
Seventh grade was a whole new ball game. People from my old school and my new school combined in order to form my junior high. I became friends again with my friend from my old school, and we moved through the next two years as great friends. Eighth grade year we were the top of the junior high, and the "sevies" had nothing on us. We felt like we could take on the whole world.
When I became a freshman, we were all taken down a few notches. We were the bottom of the pile, and that meant we needed to learn our place. I marched long and hard in band, and put my heart into golfing. "Freshman hell day" left me with a great friend as a senior who fluffed my hair up and put some wash out color in it. She made me a shirt and bought me breakfast, and we've been friends since then.
Sophomore year was a hard year. I dealt with girls on my golf team who treated me unfairly, and I would sometimes just feel like giving up. I helped out with our fall play with the new director, Mrs. Morgenson, dictating that I was the animal tamer. I became a better person that year, because I learned that I was stronger than I thought I was.
Junior year started the worrying about college. Every day I would receive a piece if mail from a different college. At some point I filled a full-sized trash bag with all the college mail I had collected. I felt sure I knew where I was going, and I wasn't about to let the brochures influence me. I dated a guy for three months who dumped me on Facebook, and I realized I had to be careful who or what I invested my heart in.
Senior year I started applying for scholarships on August 1st. I wanted to earn every scholarship possible. School started up, and I had fun with my friends at homecoming, then I applied for only two schools. I knew that I was a good enough student to get into at least one of the two schools. Fall play I played a handful of supporting roles with a lot of lines. I was proud of myself, and even managed to overcome my stage fright for the duration of the performances. After I received my acceptance letter for both colleges I knew I was in the school I had wanted since my freshman year.
November brought me someone I never thought I would meet, and his name is Alex. Since the 7th of November we've been attached by the hip. When January came, and I was 18 everything became so real I wasn't quite sure what to do. In March I decided against my dream college and instead decided on a school much for fitting to what I wanted; Hastings College. Graduation came all too fast with senior festivities and tons of family and friends. Now here I am. I've been a graduate for a week and two days, and I'm throwing away all that remains of these last weeks. It's cheesy, I know, but here those flowers lay, dead and put in the trash. Everything is just memories, and suddenly the excitement is gone. Onto another part of life. 
Sunday, May 25, 2014
Ribbon flowers
http://ribbonflowers.blogspot.com/

As you can see they all are basically the same size. Next we took some thread and a needle, then sewed through the bottoms of each, attaching them together so the same sides faced the same way. 


They should look like the above picture. If you would like a tighter flower, use a short amount of thread. Sabrina did this and her petals looked like this:
When you have sewn through them all, tighten the bunch and tie the thread before the note and the thread near the needle together very tight.
The top picture is mine, and the bottom is Sabrina's. When the thread is tied, just cut off the needle and any stray thread and you're done. If you want you could decorate with these, even make a hair clip out of one of these. They can come in all shapes and sizes just as long as you get thicker ribbon. Thanks for reading and have fun! ~Blondie~
A fluffier box cake and decorating it
This next recipe we found to make the cake fluffier, and after we made it fluffier we decorated it fabulously. We started with separating the egg yolks from the whites. Our two boxes of mix each called for 3 eggs, so we ended up separating six eggs. The whites we poured into a seperate bowl.

It said to whip the egg whites until they were stiff, but Sabrina and I had an interesting time with that. We hand whipped them for about seven minutes until we gave up. They came out more like foam with whites. I would recommend using some sort of electric mixer if you're going to do this correctly, as we did not do it correctly, but we did it almost as accurately as it should have been. When you have the egg white done, set them to the side.


So the next step is to sift all of the cake mix into your mixing bowl. Word of warning: be sure you have a working sifter before you attempt to do this. Above are the results of having to do two boxes of cake mix with a broken sifter. We sifted through about half a cup of it with the help of a spoon, and the bottom picture shows how light and fluffy the mix looks. The grisly bits left in the sifter when you have completed this task you throw away.

Here you can see we tried to sift it with a tuna strainer, and you can also see the grisly bit left over in the strainer. The strainer worked a little better than the broken sifter, but I would recommend a real sifter. We finally just gave up and dumped the rest in, then gave it a good whisking with the electric mixer until it looked nearly as good as the sifted part had.


If you can't tell the yolks look really gross.

We mixed everything together then, and the batter looks like basic, stereotypical cake batter. Nothing special.

Then we carefully folded in the egg whites, making sure to fold it and not just hit it with the electric mixer, or else whipping the whites would be pointless.

Next we seperated the batter little by little and dyed it different colors. For ours we did different colors of purple...

Then we left the leftover purple inside and made a grey color. When we had finished mixing the colors we layered them into the pans as follows:


After that we baked them. The two smaller pans took 27 minutes to bake, then the largest pan took 34 minutes. The minute they were done we pulled them out and put them in the freezer. They sat in the freezer for a little over an hour before they were cooled down and a little more firm to flip out of the pans.

To flip them out of the pans I used a small metal spatula like the above one. I used this to cute along the edges, then we carefully pried under it to shake it loose before we flipped it onto the pan.

The first tier was easy to flip because as long as it made it onto the spinning platter it didn't really matter where it was. We used a large spatula to cover it in our choice of colored frosting. When doing the edges, be sure your spatula is vertical and work with the cake or you will end up with extensive crumbs.

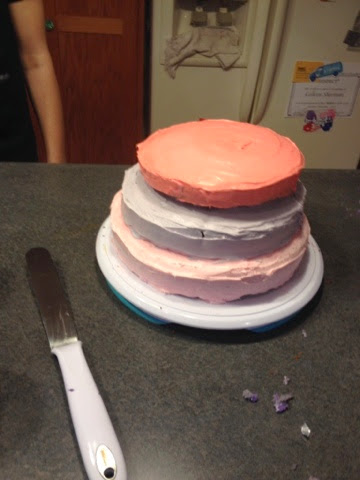
The second tier we placed on by flipping it onto the fingertips of our hands before carefully lowering it into the middle. I spotted and Sabrina placed it. As you can see in the above picture, the purple coloring in the frosting worked very well.

The last tier went on very well too, although I would recommend leveling off the top of the cakes in order to prevent the cracking you can see in the middle tier in the above picture. When attaching the cakes together we put a blob of frosting to act as glue. This helped hold it together better.
When we had completed the cake, we debated on design ideas. Sabrina had brought along hard pearl candies that looked like this:

We finally agreed on placing these on the edges about an inch apart all around the cake.

We contrasted our colors on the first two tiers, then on the top we switched between the colors. It ended up looking very professional.

On the top we put an S for our names. Since Sabrina is an artist, the S turned out amazing. When we were done it was definitely worth it due to how amazing it looked and tasted. For how amazing it turned out it didn't truly take a lot of work. I hope you'll try it! Have a good weekend! ~Blondie~
Subscribe to:
Posts (Atom)