Look it up!

Showing posts with label Pinterest. Show all posts

Thursday, July 17, 2014

The Creme Puff Experiment

So my sisters and I found a recipe for Creme puffs and we just HAD to try. So we made it an experiment for this morning before lunch.

http://www.epicurious.com/recipes/food/views/Cream-Puffs-395454

So the above is the recipe that we used but we totally didn't follow the end of it, you can though! :) 
All right so this recipe calls for...
1/2 cup whole milk
1/2 cup (1 stick) unsalted butter cut into 8 pieces
1 teaspoon and 2 tablespoons of sugar
1 teaspoon kosher salt
1 cup flour
6 large eggs
2 1/2 cups heavy whipping cream
Powdered sugar for dusting 
2 pastry bags, 1/2" star-type tip and 1 injector tip 

Start by lining 2 baking sheets with parchment paper. (You may need more but start with two). To line the baking sheets spray the baking sheets with butter spray, then lay the parchment over the top. This will allow the sheet to stick to the baking sheet. 
Start with a medium saucepan and on medium heat bring the milk, butter, salt, 1 teaspoon of sugar and a 1/2 cup of water to a boil. Mix occasionally until it's boiling. 


The last picture above should be what boiling looks like. 
When it is boiling, take the full cup of flour and pour it in, then stir it in until it's fully combined. There should be a thin film on the bottom of the pot. When you see this, transfer it to a bowl. 
Then, add the eggs in but only add 5. There's a trick though; you need to add them one by one. So you add an egg then mix it fully in before you add the next egg. 
Next put the mix into the pastry bag with the star tip. Then create circles of the mix on the parchment. 
 
Your circles should look something like this picture above. You can make them bigger if you like but not any smaller. 
When you have that, whisk the remaining egg with two teaspoons of water, then brush on top of the circles. 
The racks of the oven should be placed in the upper and middle thirds of the oven, then preheat to 450°. Once the oven is preheated, turn off the oven and place the two trays inside for 10 minutes. Once the ten minutes is up, turn the oven on to 350° and allow the puffs to bake for another 10 minutes. At 10 minutes trade the pans quickly from top to bottom or vica versa. This needs to be done quickly so the puffs don't deflate. This second baking period for our first batch we tried 10 minutes and they deflated, but the second batch we did 15 minutes and they turned out better. I'll give this advice: golden brown is not brown enough, it needs to be more of a dark brown. Not burnt, obviously, but it helps to have them dark brown so they don't deflate. 

B
Can you tell which is better? For us, the baking process took forever so we had to entertain ourselves. 
 
My entertainment was taking pictures of these two. When you pull them out of the oven you need to let them cool on the pans for a few minutes, then pull them off and place them on cooling racks. In order for them to be filled they must be completely cool inside and out. Make your best judgement. 
Now for the filling the recipe calls for 2 1/2 cups of heavy whipping cream. My sisters and I were geniuses and only got half a pint. Next time we will get more but it did work out perfectly fine the way we did it. For the filling, pour the heavy cream and 2 tablespoons of sugar into your mixer. Start out slow, then gradually speed up until you have whipped cream. Your pastry bag with your injecting tip should be easily filled with this mixture. Quick thing: if you don't have an injecting tip you are definitely missing out. With even a sandwich bag and this tip you can fill anything; cupcakes, cakes, pastries, pick one thing and try it. 
Anyway, once your bag is loaded just carefully put the tip through the first layer of your puff. This should make sure you don't put a hole through the bottom. Then just squeeze a little filling in. Tip: do not put more than two scoops in the bag at a time or you will end up with the kind of mess my sisters and I had when it came out of the back instead of the front. 
When they are filled, feel free to box them up and sprinkle some powdered sugar on the tops. This is how a few of ours turned out. 
Have fun, be inventive, and like usual, ENJOY! 
~Blondie~ 


Friday, June 6, 2014

Sock bears

And now for our last project. We used the last socks from the four pack we bought to make little teddy bears. It seems silly, I know, and our bears would tend to agree, but they actually turned out adorably.
You need 3+ buttons and 1 sock. Your supplies should include some thread, a needle, and a permanent marker. 
Above, you can see a rough sketch for the sock pattern. The toe part should look like the outline of ears. The butt should be the heel of the sock. Cut out the lines in the rough sketch, but add your own flair in any way you want. 
Make sure that the pieces have the wrong sides out then stitch along all sides except half of one side on every piece. Once you have that done, inside it out without tying off the thread. Then stuff the piece, fold in the fabric then press them together with your fingers as you stitch up the side. Then tie it and cut it off. 
The one piece that is odd is the body. Stitch the legs inside out the whole time, then cut the thread off, right side it out and stuff it. 
At the top of the body put stitches in it that makes a circle, then tighten it up to close the hole. The tail of the thread can then be tied to the end of the thread, then cut it off. This will create the body and when you have the head and arms stuffed you can move into putting it all together.
The arms should be simple to sew on in the area that arms go, as is above. For the head, take the stub at the top of the body and stitch the back of the head to the stub. The ending look should be something like above. 
Next pick out your buttons and sew on a nose and eyes. If you want, accessorize you bear in any other way you like. 
These are our bears: 
So we didn't go precisely by the instructions but they turned out adorably! Enjoy! 
~Blondie~ 


Wednesday, May 28, 2014

Sock gloves

http://interestings.org/diy-mittens-gloves/

Yep, you read the title right... Sock gloves. I know it sounds silly, but they are actually completely adorable. We didn't exactly follow the directions to the T on this one, but this project has a lot of room for the crafter's choice. 
First, start out with a pair of long socks. Short socks would probably work but you'd want the part without the feet to be at least half as long as these. 
Cut off the feet of the socks. Most people would just throw away the feet, but my sisters took the feet from ours and found they were comfy as around-the-house socks. 
Next you want to put the socks on your arms. The top of the sock should be by your elbow. Adjust the sock until you know where you want your thumb to bed, then mark it out with a small line half the size of you thumb at the base. Then take each off and cut where you marked it out. 
You should have something that looks relatively like this. From there you can decorate it and make it yours. 
Sabrina's looked like this. She plans on drawing on them to make them her own. 
So that's the gloves we made! Pretty simple, right? The fun part about this is how you can make it anyway you like. I hope you have fun making it your own! ~Blondie~ 


Sunday, May 25, 2014

Ribbon flowers

http://ribbonflowers.blogspot.com/

Our third project were these adorable little flowers. We actually hardly followed about half of these instructions due to the fact we did not have the wood burning tool, and the washers we had were not large enough for our ribbon. Instead, we started by cutting five small pieces of ribbon that were all the same size. Then we rounded the ends of them. 
As you can see they all are basically the same size. Next we took some thread and a needle, then sewed through the bottoms of each, attaching them together so the same sides faced the same way. 
They should look like the above picture. If you would like a tighter flower, use a short amount of thread. Sabrina did this and her petals looked like this: 
When you have sewn through them all, tighten the bunch and tie the thread before the note and the thread near the needle together very tight. 
The top picture is mine, and the bottom is Sabrina's. When the thread is tied, just cut off the needle and any stray thread and you're done. If you want you could decorate with these, even make a hair clip out of one of these. They can come in all shapes and sizes just as long as you get thicker ribbon. Thanks for reading and have fun! ~Blondie~ 


A fluffier box cake and decorating it


This next recipe we found to make the cake fluffier, and after we made it fluffier we decorated it fabulously. We started with separating the egg yolks from the whites. Our two boxes of mix each called for 3 eggs, so we ended up separating six eggs. The whites we poured into a seperate bowl. 
It said to whip the egg whites until they were stiff, but Sabrina and I had an interesting time with that. We hand whipped them for about seven minutes until we gave up. They came out more like foam with whites. I would recommend using some sort of electric mixer if you're going to do this correctly, as we did not do it correctly, but we did it almost as accurately as it should have been. When you have the egg white done, set them to the side. 
  
  
So the next step is to sift all of the cake mix into your mixing bowl. Word of warning: be sure you have a working sifter before you attempt to do this. Above are the results of having to do two boxes of cake mix with a broken sifter. We sifted through about half a cup of it with the help of a spoon, and the bottom picture shows how light and fluffy the mix looks. The grisly bits left in the sifter when you have completed this task you throw away. 
  
Here you can see we tried to sift it with a tuna strainer, and you can also see the grisly bit left over in the strainer. The strainer worked a little better than the broken sifter, but I would recommend a real sifter. We finally just gave up and dumped the rest in, then gave it a good whisking with the electric mixer until it looked nearly as good as the sifted part had. 
Next we added in flour. For one box of cake mix it's 3 tablespoons, but we doubled it for our two boxes and had six. Then we added in all the rest that was called for on the boxes, but instead of the whole eggs you need to only add the leftover yolks. 
If you can't tell the yolks look really gross. 
We mixed everything together then, and the batter looks like basic, stereotypical cake batter. Nothing special. 
Then we carefully folded in the egg whites, making sure to fold it and not just hit it with the electric mixer, or else whipping the whites would be pointless. 
Next we seperated the batter little by little and dyed it different colors. For ours we did different colors of purple...
Then we left the leftover purple inside and made a grey color. When we had finished mixing the colors we layered them into the pans as follows: 
Be sure you butter the pans really well with butter spray, even on the edges. If you would like, use some  parchment paper and put a circle in the bottom of each pan. This works really well to help get the cake out of the pan later, but without it and with a ton of butter works just as well. On our cake we went without the parchment. Even though the grey looks really dark it actually baked into more of a purple grey than we thought it would be. 

After that we baked them. The two smaller pans took 27 minutes to bake, then the largest pan took 34 minutes. The minute they were done we pulled them out and put them in the freezer. They sat in the freezer for a little over an hour before they were cooled down and a little more firm to flip out of the pans. 

To flip them out of the pans I used a small metal spatula like the above one. I used this to cute along the edges, then we carefully pried under it to shake it loose before we flipped it onto the pan. 
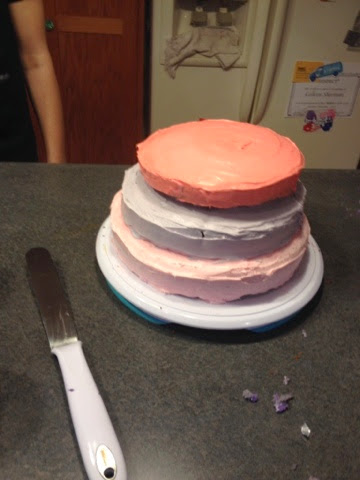
The first tier was easy to flip because as long as it made it onto the spinning platter it didn't really matter where it was. We used a large spatula to cover it in our choice of colored frosting. When doing the edges, be sure your spatula is vertical and work with the cake or you will end up with extensive crumbs. 
 
The second tier we placed on by flipping it onto the fingertips of our hands before carefully lowering it into the middle. I spotted and Sabrina placed it. As you can see in the above picture, the purple coloring in the frosting worked very well. 
The last tier went on very well too, although I would recommend leveling off the top of the cakes in order to prevent the cracking you can see in the middle tier in the above picture. When attaching the cakes together we put a blob of frosting to act as glue. This helped hold it together better. 
When we had completed the cake, we debated on design ideas. Sabrina had brought along hard pearl candies that looked like this: 
We finally agreed on placing these on the edges about an inch apart all around the cake. 
We contrasted our colors on the first two tiers, then on the top we switched between the colors. It ended up looking very professional. 
On the top we put an S for our names. Since Sabrina is an artist, the S turned out amazing. When we were done it was definitely worth it due to how amazing it looked and tasted. For how amazing it turned out it didn't truly take a lot of work. I hope you'll try it! Have a good weekend! ~Blondie~